How to get started with Python

A friendly introduction to some powerful tools
This page will help you to start with Python. My main advice is that you should opt for Python programming in Anaconda as it is the most easy and powerful option.
1. Why Anaconda (also if you are completely new to Python)
The popular data science platform Anaconda allows you to write and execute Python programs. It comes with many essential packages (pieces of software that you can use in your script) pre-installed, it allows you to install additional packages, and it manages the dependencies between these packages. It does so automatically, so you don’t need to worry about it.
Anaconda is open-source and its installation comes, for instance, with Jupyter Notebooks (which I will explain in a minute), Spyder (a conventional code editor), and R studio (which can be handy if you sometimes also program in R). Follow the following steps to get started with Anaconda and Jupyter Notebooks.
2. Install Anaconda
You can download Anaconda through this link.
The standard installer (as shown above) is a 64-bit Windows installer. You can also select other operating systems. If you have Windows, and you are not sure whether you have a 64 or 32-bit system, then go on your machine to This PC, give it a right mouse click, choose Proporties, and there you find the information under System type.
Once you downloaded the installer, follow the recommended installation options.
3. Open a blank Jupyter Notebook
If things went well, and you work on a Windows computer, then you should be able to open a blank Jupyter Notebook through the menu Start > Anaconda3 (32/64-bit) > Jupyter Notebooks (anaconda3). This will automatically open a browser or a new browser tab with an empty Notebook.
If things did not go well, then you may check out the Anaconda Troubleshooting page, or consult Google for a solution for the problem.
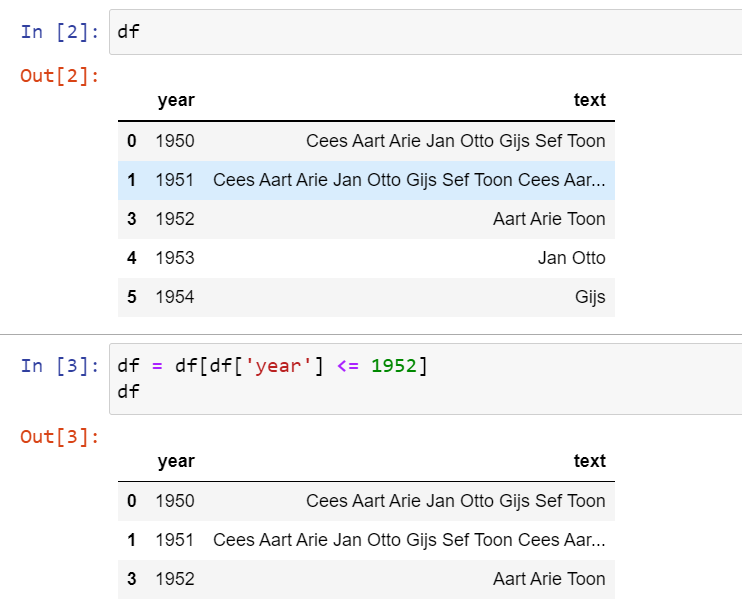
Jupyter Notebooks are a data scientists’ favorite. You write and run your programs/code snippets from a “Notebook” in your browser. It consists of code cells, which, if you like, directly show the output of a command. For instance, we have a dataframe “df” (see the screen shot below) in which we like to limit the observations to those occurring before 1953. In one of the code cells, we type df = df[df['year'] <= 1952] and then inspect the transformed dataframe by calling again df. Since the results become directly visible, you can easily assess whether the code works as intended. It makes programming a bit more intuitive.
4. Run your first Python program inside a Jupyter Notebook
This Python short post provides a Jupyter Notebook with a relatively simple script. You can copy-paste the code from the cells to your own Notebook. Then, click inside the cell, and press Controll + Enter to run the cell. To create a new blank cell, click inside an excisting cell and press Esc + B (this will create a new cell below your initial cell). For more Jupyter Notebook keyboard shortcuts, see this link.
5. Install packages
The example below shows you how to install Plotly (a popular Python package used for graphing). The procedure will be roughly the same for other packages.
- (i) In Search Google type: “conda install plotly” (or the name of any other package which you wish to install). This first search result brings you to an Anaconda.org page where you find the commmand line for installing Plotly:
conda install -c plotly plotly.
Note: while most Python packages are available on Anaconda, occasionally they are not. In such cases you need to install the package through PIP (see). However, if you have a choice, go for Anaconda, as it will help you to manage the dependencies between packages.
- (ii) Start Anaconda Prompt by going to: Start > Anaconda3 (32/64-bit) > Anaconda Prompt (anaconda3)
Note: If you installed Anaconda with Adminstrator permission, then you also need to open Anaconda Prompt with Administrator permission to install packages. To do so, go to: Start > Anaconda3 (32/64-bit) > Anaconda Prompt (anaconda3) > give it a right mouse click and choose: More > Run as Administrator.
- (iii) Inside the Anaconda Prompt window you copy-paste:
conda install -c plotly plotlyand press Enter. Wait until you get the option: “Proceed ([y]/n)?”. Type:yand press again Enter. Wait until all the processes are finished, then, if things went well, you should see “(base) PS C:\Windows\system32>”. This means that the package is installed. Now you can close the Anaconda Prompt window.
6. Follow a command line and Python for beginners tutorial
To get started, I recommend you to follow Appendix A: Command Line Crash Course, part of the course Learn Python the Hard Way. This course is easy, fun, and it goes to the very basics of how to work with a “command line” interface (an alternative for the “point-and-click” system that most people are used to). From the website: “This appendix is a quick super fast course in using the command line. It is intended to be done rapidly in about a day or two.”
7. Pythonistas with useful websites
If you can’t get enough of Python, then here are some people with noteworthy websites to explore.
Melanie Walsh, Assistant Teaching Professor in the iSchool at the University of Washington, created the online text book Introduction to Cultural Analytics & Python. Besides basic Python coding instructions, it also provides useful, well-organized information on text analysis and network analysis, among other things.
Chris Albon, Director of Machine Learning at the Wikimedia Foundation, has a website with instructive, easy to follow code examples, ranging from tasks such as Select Rows With A Certain Value to running Convolutional Neural Networks in Keras. Albon’s website is the most extensive, high-quality Python resource I came across so far. I used it predominantly for data wrangling in Pandas, but it offers much more.
Photo by Jukan Tateisi.
